Advanced field services, transformer chemistry testing, reliability solutions – these are some of the extra services offered by condition monitoring specialists, WearCheck, in addition to traditional used oil analysis following recent expansion.
The company’s advanced field services (AFS) division incorporates specialist monitoring techniques such as rope testing, technical compliance and non-destructive testing (NDT).
Adri Ludick, NDT manager for WearCheck, outlines the benefits and details of various non-destructive testing techniques.
‘The NDT approach features a variety of testing techniques through which the properties and condition of a component or system are evaluated without causing any permanent damage to it. NDT is typically used in critical component assessments, machine condition assessments and inspection of ancillary equipment such as main vent fans, compressors, mills, pumps and conveyors.
‘WearCheck’s NDT team delivers quality assurance and quality control of new as well as refurbished components.
‘Our main array of NDT tests includes eddy-current-, magnetic-particle-, liquid penetrant-, radiographic-,ultrasonic-testing and visual inspection,’ he says.
The main advantage of NDT methods is that they do not permanently alter the test object undergoing inspection, making NDT a valuable tool that can save both money and time in a condition monitoring programme.
Ludick explains some of the test methods in more detail:
Eddy-current testing
This detects surface defects, such as early-stage cracks, on metallic machine components, and is used across a wide range of industries, from aerospace to beer brewing.
During the testing process, a high frequency electric current (an eddy current) is induced into the material, then the response of that eddy current field is measured. The information is processed to yield a profile of the component.
Defect-free material has a very specific “fingerprint”, therefore, when the test results are compared to this, the presence of defects can be assessed.
When it comes to cracks, the earlier they can be detected, the less potential damage they can cause to the component. Eddy-current testing can detect crack initiation at extremely early stages.
An advanced option is the phased array eddy current testing, which creates a 3D picture of the component, giving a more visual insight into anomalies.
Magnetic-particle testing
This is a similar application to eddy-current testing, in that both techniques detect surface cracks on magnetic materials. This is used across a wide range of industries.
The process in this test is to magnetise the component and then saturate it with a very fine magnetised ink or a fine powder.
Any anomaly in the surface being tested causes a concentration of the magnetic field around it, therefore drawing the magnetic ink to the crack and making the defect visually detectable. (Eddy-current testing requires the interpretation of a signal on an oscilloscope screen.)
An advantage of magnetic particle testing is that it can be used to test very large surface areas, very quickly.
Liquid penetrant testing
This is typically performed on non-magnetic materials (e.g., copper, aluminium), and is essentially a non-magnetic version of magnetic particle testing.
It involves a five-step process. Firstly, the surface is cleaned of all foreign material. Next, it is saturated with a non-harmful penetrating ink. The surface does not have to be horizontal. Thirdly, the penetrant is wiped off the surface of the material. Fourth, a developing chemical is applied over the ink. The developer draws the penetrant from any cracks to form a visible indication. In the fifth step, the component surface is visually examined during and after the development process and results are recorded.
This method is used to test such items as vehicle components and ventilation fan blades.
Radiographic testing
This is similar to X-rays done on humans and uses different types of X-ray sources which penetrate the material and display onto an X-ray plate behind the component. It is a widely-used technique which detects sub-surface defects which cannot be detected visually.
For thinner materials, such as a metal plate, a weak X-ray source is used, while thicker components (e.g., ventilation fan) require a stronger X-ray. The X-ray sources are contained in a “bomb”, which is aimed at the target.
Radiographic testing is often used on welds to test the integrity of the bond between the weld metal and the parent metal. Using an electronic form plate instead of a photographic form is a new trend in this technique,
Ultrasonic testing
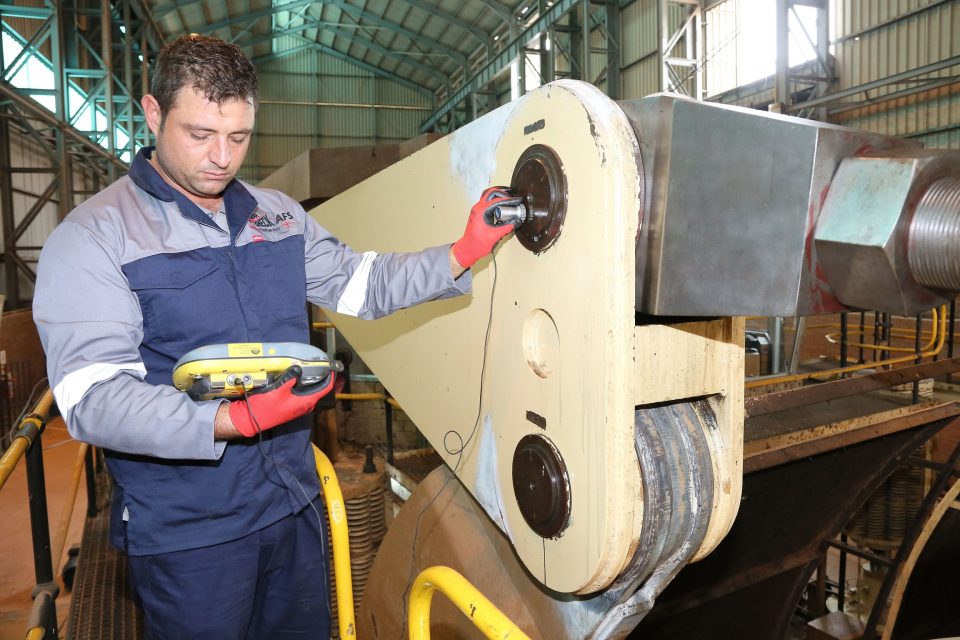
Just how a “fish finder” on a fishing boat reveals the depth and size of the fish, this uses similar methodology, allowing technicians to see sub-surface defects in both metal and non-metal components.
During the process, an ultrasonic flaw detector instrument fires ultrasonic pulses into the material, and simultaneously detects the reflection. By measuring the time difference between the pulse and the reflection and knowing the speed of sound in the test material, you can pinpoint the location of the defect.
It is widely used across all industries to detect anomalies.
An advanced option is phased array ultrasonic testing, where, instead of one pulse, 64 pulses are fired into the component. By fine-tuning the pulse-strength, we can “steer” the beam in different directions. The advanced option enables us to get a 3D picture of the component, instead of merely a pulse on a screen.
Visual inspection
WearCheck’s highly-experienced, well-trained technicians conduct a multitude of visual inspections on a range of components daily. Their eyes are conditioned to recognise early-stage defects which are visible, and to identify potential “hotspots” which require further testing.
For more information, please visit www.wearcheck.co.za or email support@wearcheck.co.za or call WearCheck’s head office on +27 (31) 700-5460.
ENDS [900 words]
E: marketing@wearcheck.co.za W: www.wearcheck.co.za T: +27 (31) 700-5460
Caption:
Jaco Venter, a senior machinery inspector at WearCheck, conducts ultrasonic testing on a winder’s brake components during a non-destructive testing (NDT) routine.
Released on behalf of WearCheck by Just Write Public Relations
Media queries: Sharon 082 8230539 or sharon@justwritepr.co.za


